Shoes pile up faster than most people realize. Whether it’s sneakers crowding the bedroom floor, heels scattered in the closet, or athletic shoes exploding from under the bed, shoe storage quickly becomes a problem that affects both organization and home aesthetics. The good news? Smart shoe storage solutions exist for every space, budget, and lifestyle, from cramped apartments to sprawling homes. This guide walks through practical options that actually work, covering everything from simple over-the-door organizers to custom-built systems. The right approach depends on your available space, the number of shoes you own, and how often you need quick access to them.
Table of Contents
ToggleKey Takeaways
- Proper shoe storage solutions protect your footwear investment, extend shoe lifespan by reducing moisture and dust damage, and eliminate time wasted searching for matching pairs.
- Over-the-door organizers offer the fastest, cheapest shoe storage option, holding 12-24 pairs with zero-tool installation, making them ideal for renters and tight spaces.
- Wall-mounted shelving and freestanding racks provide flexible, scalable options for larger collections, with wall-mounted systems being best when floor space is limited.
- DIY shoe storage projects like PVC pipe racks and pallet organizers cost $30-100, offering customization and significant savings compared to pre-made systems ranging $150-300.
- Monthly maintenance—seasonal rotation, surface cleaning, and proper shoe prep before storage—ensures your organization system remains functional and protects shoe quality long-term.
- Clear plastic shoe boxes combined with drawer dividers create effective tiered storage that prevents creasing, enables quick identification, and maximizes closet corner and under-bed space.
Why Proper Shoe Storage Matters
Beyond aesthetics, proper shoe storage protects your investment and saves time. Shoes left in piles deteriorate faster, moisture, dust, and creasing shorten their lifespan. Organized systems mean you actually know what you own, reducing impulse purchases of duplicates hiding in the back of the closet.
From a practical standpoint, having designated shoe storage cuts morning friction. No more searching through a pile to find matching pairs. For families with multiple people, clear organization prevents arguments about whose shoes are where. In small spaces especially, clutter creates psychological stress: keeping shoes contained makes a room feel larger and calmer.
Proper storage also protects your flooring and furniture. Shoes scattered across hardwood trap moisture and grit that scratch surfaces over time. Storing them off the floor entirely eliminates this damage. Whether you’re renting or own, a thoughtful shoe storage system is one of the highest-ROI organization moves you can make.
Over-The-Door Organizers: Maximum Space, Minimal Effort
Over-the-door shoe organizers are the fastest, cheapest way to add storage without touching walls or floors. They hang on any standard door, bedroom, closet, front entry, and hold 12 to 24 pairs depending on design.
Why they work: Installation takes 10 minutes and requires no tools. Most use adhesive hooks or hang over the door frame with felt padding to protect the paint. They’re perfect for seasonal shoes, kids’ sneakers, or current-rotation footwear.
Downsides: Deep shoes (like winter boots) may not fit in shallow pockets. Heavy organizers can stress hinges over time, check weight limits if loading with work boots or heeled shoes. Door swinging can be blocked if the organizer hangs too low.
Material options:
• Fabric organizers with clear pockets let you see shoes at a glance: they’re lightweight and machine-washable.
• Plastic versions are durable and easy to wipe clean: ideal for entryways where grit accumulates.
• Metal-frame organizers with canvas pockets offer stability for heavier footwear.
For bedroom shoe storage in tight quarters, over-the-door solutions keep shoes visible and accessible without consuming floor or shelf space. Test the door’s stability first, if it creaks or feels loose, reinforce the hinges before adding weight.
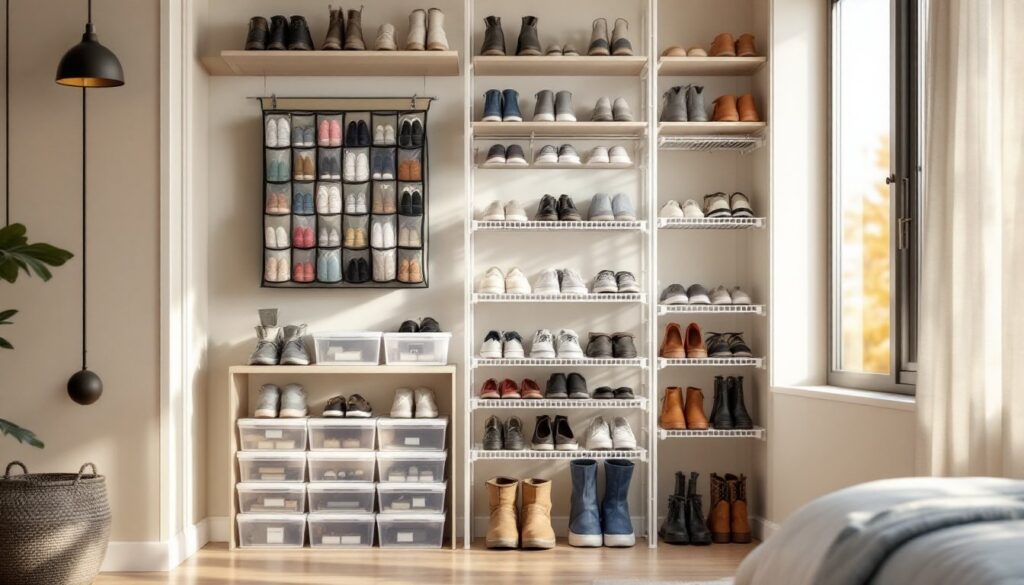
Shoe Racks And Shelving Systems
Shoe racks and dedicated shelving give you the most flexibility for larger collections. They range from simple two-tier wire racks to elaborate built-ins, depending on budget and space.
Freestanding vs. Wall-Mounted Options
Freestanding racks sit against a wall or in a closet corner without fastening. They’re portable (useful for renters), require no drilling, and are easy to adjust. Standard depths run 10 to 14 inches: heights range from 2-tier mini racks (24 inches) to tall 6+ tier units (60 inches). Weight capacity matters, check limits before stacking shoes: plastic racks hold around 200 pounds, steel racks 400+. For shoe storage small space situations, a tall narrow rack maximizes vertical room while keeping floor footprint minimal.
Wall-mounted shelving is ideal when floor space is precious. Floating shelves look cleaner than racks and can double as display if you have attractive shoes. Installation requires finding studs (use a stud finder: don’t guess) and using appropriate anchors. Standard shelves are 8-12 inches deep and 24-36 inches wide. Each shelf typically holds 10-15 pairs depending on shoe depth.
Installation tips:
- Measure and mark shelf height with a level: leave 8-10 inches between shelves for shoe depth plus breathing room.
- Locate wall studs at 16-inch intervals: mount brackets directly into studs for safe weight distribution.
- Use concrete anchors in drywall only if studs aren’t available, limit weight and number of shoes.
- Ensure shelving doesn’t block doors, windows, or create trip hazards in hallways.
Metallic or wood shelving pairs well with storage solutions for small bedrooms where vertical storage matters most. Paint or stain shelves to match your closet interior for a polished look.
Shoe Boxes And Drawer Dividers
Clear plastic shoe boxes are underrated organization tools. They stack neatly, protect shoes from dust, and let you see contents without opening. Label the front with a photo or printed shoe name for quick identification.
Why they’re effective: Boxes keep pairs together, prevent creasing, and allow vertical stacking in closet corners or under beds. Clear ones are superior to opaque, knowing what’s inside saves time and reduces duplicate purchases. Standard shoe box dimensions are roughly 13 × 9 × 5 inches: they fit easily on shelves, in closets, or under beds.
Best practices:
• Store shoes in their original boxes if they’re in good condition: tissue paper inside prevents moisture.
• Use acid-free tissue for delicate or expensive shoes: regular tissue can transfer dyes over time.
• Store off the floor in basements or garages (moisture) and away from direct sunlight (fading).
• Label with photos, faster than reading tiny text when you’re searching.
Drawer dividers work for shoes stored in bedroom dresser drawers or built-in closet drawers. Bamboo or plastic dividers create compartments that keep pairs separated and prevent heels from getting bent. Install dividers perpendicular to the drawer depth so shoes stand upright like file folders.
For nested storage in dresser drawers, place heavier shoes on the bottom (winter boots, work shoes) and lighter pairs (ballet flats, flip-flops) on top. This prevents crushing delicate shoes under weight. Combining boxes with drawer dividers gives you a tiered system that works for most closet layouts.
DIY Shoe Storage Ideas On A Budget
Building your own shoe storage is cheaper and more customized than buying pre-made systems. Free DIY furniture plans from trusted sources provide step-by-step instructions for simple builds that don’t require advanced woodworking skills.
Simple PVC pipe shoe rack:
PVC pipe (4 inches diameter) cut into 12-inch lengths and mounted horizontally in a frame creates a modular rack. Shoes slide onto pipes: you can remove and replace pipes as needed. Materials cost under $30 for a 10-pair rack. Use a hacksaw to cut pipes, sand edges smooth, and assemble a wooden frame using 2×4 lumber. Anchor securely to studs if mounting to walls.
Pallet shoe storage:
Reclaimed wooden pallets can be turned into rustic racks. Stand pallets vertically and wedge shoes between slats, or mount pallets horizontally on walls and rest shoes on the slats. Free pallets often appear behind retail stores (ask permission first). Sand rough edges, stain or paint as desired, and secure firmly so shoes can’t tumble.
Tension rod closet organizer:
Screw-in tension rods (the kind used for shower curtains) can be mounted at angles inside closet shelving to create diagonal slots. Shoes fit snugly against the rod and won’t slide. Each rod costs $5-10 and holds 8-12 pairs depending on shelf depth.
Materials for budget builds:
• 2×4 lumber: ~$3-5 per 8-foot board
• 1×12 pine shelving: ~$15-20 per 8-foot board
• Stainless steel L-brackets: ~$2-4 each (you’ll need two per shelf)
• Wood screws (2.5 inch): ~$8 per 25-pack
• Sandpaper, primer, and paint: ~$20-30 total
Total cost for a modest 3-shelf wall-mounted unit: $60-100. Compare that to pre-made metal racks ($150-300) and the savings become clear. DIY solutions also fit exact dimensions, no wasted space. Creative storage ideas from design sites inspire customization. Always wear safety glasses and a dust mask when cutting lumber or PVC, and use a stud finder before drilling into walls.
Maintaining Your Shoe Storage System
A well-organized system only works if you maintain it. Set a monthly habit: pull everything out, wipe down surfaces, and reorganize shoes by season or frequency of use.
Seasonal rotation: Move off-season shoes to less accessible storage (under beds, top shelves) and bring current-season shoes to easy-reach zones. Winter boots deserve bin storage with desiccant packets in off-months: sandals can move to basement bins during cold weather.
Cleanliness: Wipe shoe storage surfaces monthly to prevent dust accumulation. Vacuum or sweep under racks. For over-the-door organizers, check pockets for debris and lint.
Shoe care before storage:
• Clean shoes before putting them away (dirt and grit age materials faster).
• Air dry completely, moisture trapped in storage encourages mold and odor.
• Use cedar blocks or activated charcoal to absorb moisture in closed boxes.
• Stuff heels and tall boots with acid-free tissue to hold shape.
Rethinking your system: If your chosen storage method isn’t working after 2-3 months, don’t ignore it. Too-small racks that require constant reshuffling waste time. Overstuffed closets defeat the purpose of organization. Upgrade or adjust before frustration sets in. Strategic storage solutions often require tweaks based on real-world use, that’s normal and expected. Keep receipts for returnable items until you’re confident the solution fits your routine.
Conclusion
Shoe storage doesn’t require expensive systems or professional installation. Start with what fits your space and budget, over-the-door organizers for quick wins, wall-mounted shelving for long-term solutions, or DIY builds for customization. The key is choosing a method you’ll actually maintain. A well-organized shoe storage system saves time, protects your investment, and makes your space feel intentional. Measure your available space, count your shoes, and pick the approach that works for your life.